Wainscoting can be used in a variety of ways to improve the outlook of your room.
Below is a step by step, DIY guide on the same;
Settle on the design of the wainscoting
There are many designs in which wainscots can be installed. They range from full walls panels, boxed panels, and halfway boxed panels.
All these depends on your taste and needs. You will also need to consider the available room space
You can easily google some of these designs to settle on one.
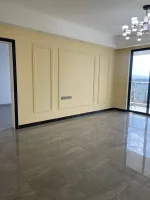
Below are images of some of the designs I recently worked on a previous project.
.webp")

.webp")

Purchase the necessary materials and tools
Some of the materials you will need include wainscoting boards/ panels, strings, marker pens, 3/4 inch nails, and screws.
You will also need sandpaper, wall filler, covermatt paint and the final color desired paint.
During purchase, it is advisable that you know the measurements of your space so that your supplier can easily help you estimate the quantities of the materials that you will need.
Tools needed include standard level, hammer, drill, measuring tool, brushes, rollers, and hacksaw blades.
Prepare your Space
Remove all the items in the room if it was previously occupied.
Thoroughly clean the room of any dirt to ensure a clean working space.
Remember to ensure that any existing electrical points or wall plates are in the correctly placed or whether they need to be moved.
Setting and Marking.
Using a tape measure, standard levels, nails, and a marker pen, carefully mark the horizontal and vertical outlines of the wainscot panels as per the selected design.
This horizontal line will be your guide during installations. You might need a helping hand at this stage.
Install the wainscot boards / panels.

Begin installing the base and top boards. Ensure there is an expansion gap between the wainscot and the floor. Double check that the board is level and the secure it with screws and nails.
Next install the vertical wainscot boards ensuring they are properly aligned.
You will also need some wood filler at this stage to seal off any gaps between the newly installed boards.
Boards and Walls Finishes

After all the wainscot boards are well placed, prepare your wall undercoat and paid using a brush in between the boards and surrounding walls that might have been dirtied during the paintworks.
Next mix properly the final paint and apply two coats as per your desired design.
Another option could be to install a wall paper of your choice in between the boards.
Below is a step by step, DIY guide on the same;
Settle on the design of the wainscoting
There are many designs in which wainscots can be installed. They range from full walls panels, boxed panels, and halfway boxed panels.
All these depends on your taste and needs. You will also need to consider the available room space
You can easily google some of these designs to settle on one.
Below are images of some of the designs I recently worked on a previous project.
Purchase the necessary materials and tools
Some of the materials you will need include wainscoting boards/ panels, strings, marker pens, 3/4 inch nails, and screws.
You will also need sandpaper, wall filler, covermatt paint and the final color desired paint.
During purchase, it is advisable that you know the measurements of your space so that your supplier can easily help you estimate the quantities of the materials that you will need.
Tools needed include standard level, hammer, drill, measuring tool, brushes, rollers, and hacksaw blades.
Prepare your Space
Remove all the items in the room if it was previously occupied.
Thoroughly clean the room of any dirt to ensure a clean working space.
Remember to ensure that any existing electrical points or wall plates are in the correctly placed or whether they need to be moved.
Setting and Marking.
Using a tape measure, standard levels, nails, and a marker pen, carefully mark the horizontal and vertical outlines of the wainscot panels as per the selected design.
This horizontal line will be your guide during installations. You might need a helping hand at this stage.
Install the wainscot boards / panels.
Begin installing the base and top boards. Ensure there is an expansion gap between the wainscot and the floor. Double check that the board is level and the secure it with screws and nails.
Next install the vertical wainscot boards ensuring they are properly aligned.
You will also need some wood filler at this stage to seal off any gaps between the newly installed boards.
Boards and Walls Finishes
After all the wainscot boards are well placed, prepare your wall undercoat and paid using a brush in between the boards and surrounding walls that might have been dirtied during the paintworks.
Next mix properly the final paint and apply two coats as per your desired design.
Another option could be to install a wall paper of your choice in between the boards.
Clean the room and step back to enjoy your work!